

Model year 2019 and newer Polaris Off-Road Vehicles that are equipped with RIDE COMMAND feature seven-button 7" Displays.
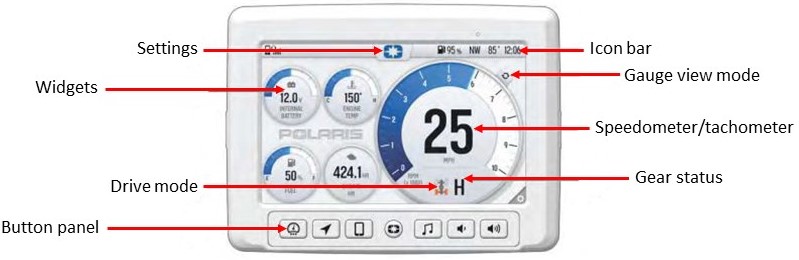
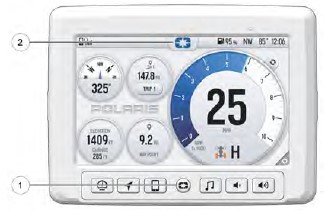
The button panel includes the following seven buttons.
| Button | Description | Function |
|---|---|---|
 | Menu/North Star Button | Press the Menu/North Star button to access the settings. To reboot the display, press and hold for 5 seconds. |
 | Gauge Screen Button | Press the Gauge Screen button to select from available screens. |
 | Map Button | Press the Map button to access the map, manage your rides and waypoints and to see your friends on the map with Group Ride. |
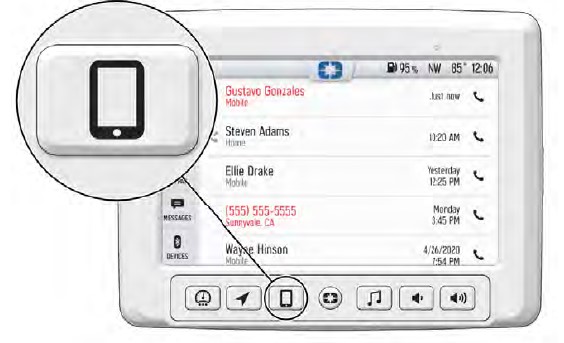
 | Phone Button | Press the Phone button to access your Bluetooth®-connected phone, including recent calls, contacts, dialer and messages. |
 | Audio Button | Press the Audio button to access the Radio, Weather, USB and connected Bluetooth® music interface. |
 | Volume Increase Button | Press the Volume Increase button to increase the volume. |
 | Volume Decrease Button | |
| Press the Volume Decrease button to decrease the volume. Press and hold to mute the volume. |
Drive Mode
The drive mode indicator will display one of the following drive modes.
| Indicator | Description | Function |
 | Two-Wheel Drive | When the switch is on 2x4, the vehicle is in two-wheel drive at all times. |
 | All-Wheel Drive | When in all-wheel drive, the demand drive unit will automatically engage any time the rear wheels lose traction. When the rear wheels regain traction, the demand drive unit will automatically disengage. There is no limit to the length of time the vehicle may remain in 4x4. The vehicle automatically engages 4x4 when operating in reverse if the switch is set to 4x4 position. |
 | Turf Mode | When operating in turf mode, the inside rear wheel will rotate independently from the outside wheel during turns. Operate in turf mode only as needed to protect smooth, level surfaces from tire damage. Do not operate in turf mode when climbing or descending hills, when sidehilling, or when operating on uneven, loose or slippery terrain such as sand, gravel, ice, snow, obstacles and water crossings. Always operate in AWD on these types of terrain. |
Settings
From the Settings menu, you can view vehicle information, manage Bluetooth® devices, update display software and more. Navigate to the Settings menu by pressing the Menu/North Star button (1). You can also access the Settings menu by pressing the Polaris logo at the top of the display screen (2). This will open the Badge Panel. From the Badge Panel, select the Settings tab, and then press the All Settings button located in the lower-right corner of the display screen.
Info Settings
Select the Info tab to view basic information about your vehicle, such as:
- Vehicle model
- VIN
- Software version
- Odometer miles
- Engine hours
- Distance to next service
General Settings
Select the General tab to do the following:
- View Bluetooth® devices
- View phone notifications
- Change language and units
- Update software
- Update maps/trails
Time Settings
Select the Time tab to do the following:
- Set time from GPS
- Select time zone
- Enable/disable Daylight Saving Time
- Set time
- Set date
- Enable/disable 24–hour format
Audio Settings
Select the Audio tab to do the following:
- Access equalizer
- Access balance and fader
- Clear radio presets
- Set radio tuner region
Vehicle Settings
Select the Vehicle tab to do the following:
- View diagnostics
- View oil life status
- View GPS status
- Set V2V antenna status
- Enable/disable Plow Mode (if equipped)
Icon Bar
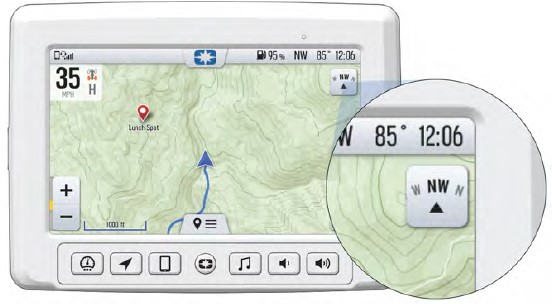
The icon bar at the top of the screen displays cell phone-related information, ambient temperature, clock and GPS information. Some of these built-in features are only functional with the addition of Polaris accessories. Your Polaris Dealer can assist.
In most situations, the GPS and mapping features will function best while the vehicle is outdoors in an open space.
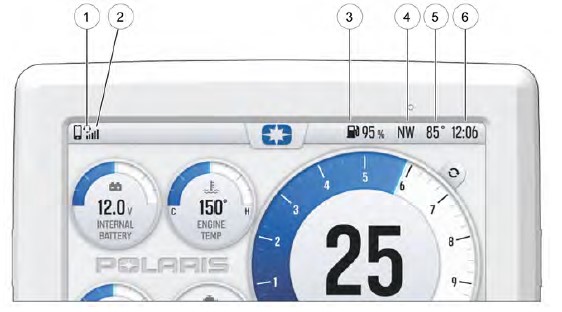
| Icon | Description | Function |
|---|---|---|
| 1 | Headset | Displays icon if headset is connected |
| 2 | Signal Strength | Displays current cell signal strength |
| 3 | Fuel Level | Displays current fuel capacity percentage |
| 4 | Vehicle Direction | Displays vehicle direction |
| 5 | Ambient Temperature | Displays ambient temperature |
| 6 | Clock | Displays current time |
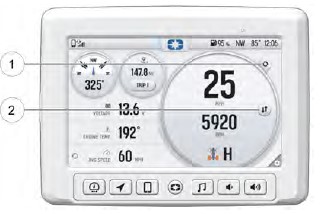
Gauge View Mode
Press the icon (1) to toggle between the two available gauge view modes, Analog and Digital. While in the digital gauge view mode, press (2) to invert the MPH and RPM units.
Menu/North Star
The display automatically turns on when the vehicle is started up.
To switch between the active and quiet logo screens, press and hold the button for 4 seconds.
Note: Audio will remain on when the display is in quiet logo screen.
To perform a hard reboot of your display, press and hold the North Star button for 5 seconds. If the display gets into a locked-up state, a reboot may correct the issue.
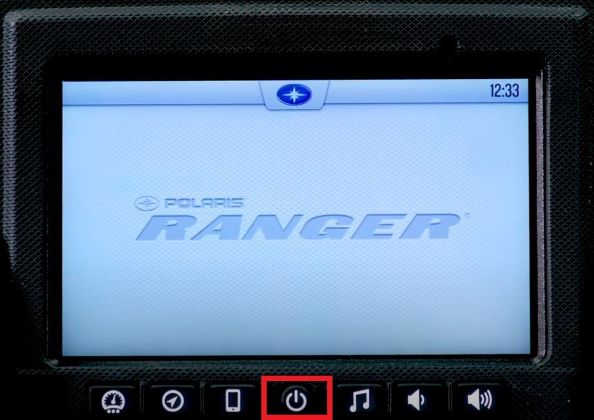
Pressing the North Star button once will activate the pop-down Badge Panel.
To take a screenshot on the display, insert a USB drive in the USB connector in the glove box and press and hold the Gauge Screen button and North Star button.
Badge Panel
The Badge Panel, or Control Panel, provides easy access to frequently used features, a list of recent notifications and basic display and vehicle controls.
To access the Badge Panel, press the Polaris logo at the top of the display screen (1) or press the Polaris Menu/North Star hard button in the middle of the hard button panel. This will pull down the Badge Panel.
Read the description below for the functions of various features on the screen.
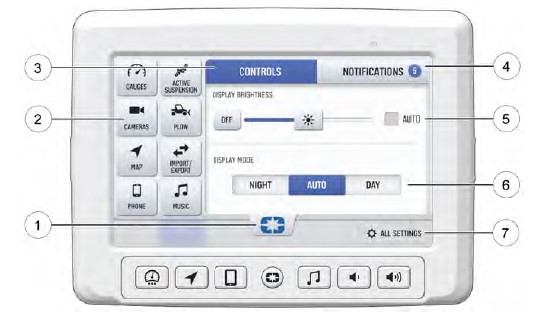
(1) Badge Panel.
(2) The App Tray provides easy access to key features on the display screen. Tap on any of the listed icons to navigate to that display screen. For example, tap the map icon to navigate to the map screen, or press the plow icon to navigate to the Plow Mode screen on vehicles equipped with Plow Mode.
(3) From the Controls tab, adjust brightness and display settings.
(4) Use the Notifications tab to view and manage notifications.
(5) Brightness Settings allow you to manually control screen brightness or set to Auto for automatic adjustments.
(6) Display Mode allows you to switch your screen between Night Mode, Day Mode or Auto, which will adjust display brightness based on changing light conditions.
(7) Use the All Settings button to access settings not shown on the Badge Panel.
Gauge Screen
Press the Gauge Screen button to toggle between gauge screens. The display comes loaded with two different gauge screens. Additional gauge screens can be added or deleted.
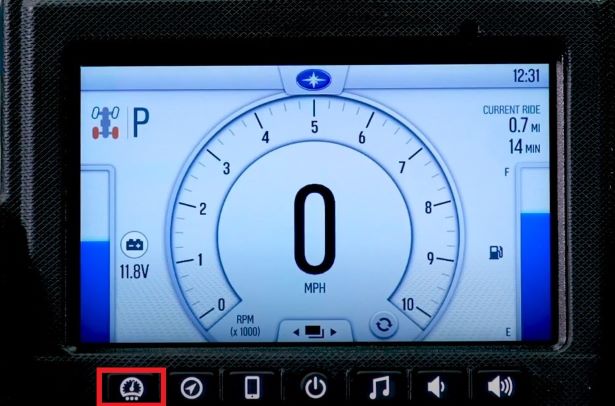
The gauge/home screen displays the following information:
- Speed
- RPM
- Battery level
- Engine temperature
- Gear selector
- Drive selection
- Current ride time and distance
To customize your gauge screens, press the gear icon located in the lower-right corner of the display. Each gauge screen is customizable and can be set up in the following configurations:
- Four round widgets
- Two round widgets and a list of three data values
- A list of five data values
Map Screen
Press the map screen button shown below to display the map screen. The map will center you based on the location of the GPS.
Note: Controls on the map surface disappear after 10 seconds of inactivity. Return with a tap anywhere on the map.
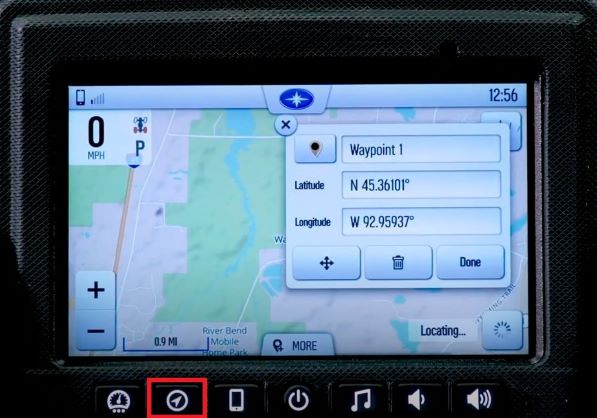
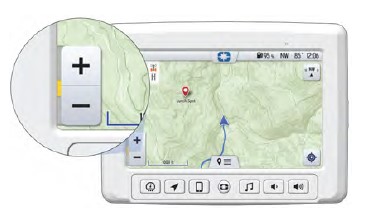
Use the plus and minus signs on the left side of the screen or pinch the screen with your fingers to zoom in and out on the map.
The compass icon on the right side of the screen toggles between North Up and Trail Up views. It will also re-center your vehicle if it is not already centered.
| Map Orientation | Map Icon |
| North Up view locks the map's orientation so that north is always at the top of the screen, regardless of your vehicle's position or direction. | 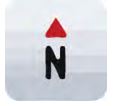 |
| Course Up view rotates the map to match the direction of your vehicle. | 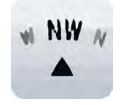 |
Phone Screen
Connect a smartphone and headset to listen to audio, make and receive calls and text messages and access a phone's contact list, favorites and call history.
Note: A headset MUST be paired to make and receive calls from the touchscreen display.
The display is compatible with Android® and iOS® phones. For more on the latest operating system compatibility, visit the Off-Road RIDE COMMAND website.
You can use the Bluetooth® connection to:
- Pair and connect a phone or media Bluetooth® device and a Bluetooth® headset.
- See a list of paired devices with the connection status of each device.
- See the reception and network type of phones.
- Listen to music over a headset.
For more information, read Connecting Bluetooth® Devices to 2019 and Newer RIDE COMMAND.
Audio Screen
Press the Audio Screen button shown below to display the audio screen.
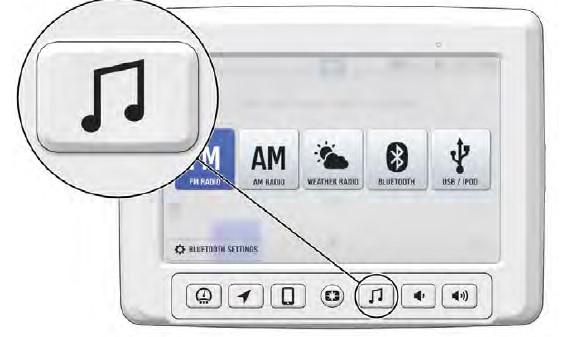
Use the source button in the top-left corner to change between FM, AM, Weather, Bluetooth® and USB Audio.
Press the tune up or down icons to change the radio station by small increments or press the scan up or down icon to search for the next quality signal station. To mute the audio, use the volume controls to turn the volume all the way down or press and hold the volume decrease button.
To set favorites, scroll to a radio station and hold an empty favorite icon. Press the arrows on either side of the favorites to view all 18 favorite slots.
For more information on the 7" Display, consult the RIDE COMMAND website or read the User's Guide.
To browse all RIDE COMMAND articles, read Guide to RIDE COMMAND for Off-Road Vehicles.
For more information, see your authorized Polaris Dealer. Find a dealer near you with the Dealer Locator.
Android® is a registered trademark of Google LLC
Bluetooth® is a registered trademark of Bluetooth Sig, Inc.
iOS® is a registered trademark of Cisco Technology, Inc.
iPod® is a registered trademark of Apple Inc
Unless noted, trademarks are the property of Polaris Industries Inc.
© 2023 Polaris Industries Inc.


